Having an HTTP API for a game is great but until players can visually interact with the game it really won’t be much fun to play. Below I will demonstrate how Bootstrap and AngularJS can be used to quickly make a simple (but pretty) interactive user interface for the game. To keep things simple, the game will be played in hot-seat style (both players will take turns in the game using the same computer and browser session).
If you haven’t been following this tutorial series, the name of the game is Pegger. If you would like to brush up on the rules and/or skip straight to the code, check the project out on GitHub.
For those who just want to try the game out, you can Play Pegger Here!
Before I dive into the code let me review what the API looks like. Pegger is a simple peg-jumping game that can be boiled down to the following HTTP operations:
POST /gamesWith no request parameters to create a new game. The response will contain the starting layout of the game.PUT /games/{gameId}/pegs/{pegId}With JSON that represents the new location of a peg to move a peg to a new location. The response will either be an error explaining why the move was invalid or redirect you to the new state of the game.
Like I said, it’s really simple. I hope it makes for a good basic intro to the basic features of AngularJS and to a lesser extent, Bootstrap.
Client Requirements
What does the client need to do? Obviously there needs to be a way to start a game and then move pegs around, but let me go through the exercise of enumerating some of the more specific tasks that the client should do:
- Present a home page where players can find the rules and start a new game.
- Create a new game on the server and render the starting layout of the pegs.
- Allow a player to select a peg and move it to a new location.
- Display any helpful messages that the server might provide in response to a peg being moved.
These criteria are still straight forward but they provide a good starting point for implementing a browser client.
Now it’s time to create that home page.
Introducing Bootstrap
Among other things, Bootstrap is a suite of CSS styles that take a lot of the grunt work out of creating a consistent looking web site. For developers it helps free us up to write code and content instead of having to mess around with styles and browser compatibility. For the most part I lack that web design knack so a framework such as Bootstrap is very appealing to me.
Bootstrap also has great documentation and good examples. While looking through the examples for some inspiration I came across the “jumbotron” component and a narrow jumbotron example that I thought might fit the needs of Pegger well. The jumbotron is basically a big box that is the focal point of your page.
To get things started I grabbed the source for the narrow jumbotron example and slapped it into pegger-war/src/main/webapp/index.hml. I then customized the HTML by doing the following:
- Got rid of the header above the jumbotron so that the jumbotron would be the first and top-most component on the page.
- Replaced the titles of the two-column section below the jumbotron with links to the rules, this tutorial series, the source code on GitHub, and an about page. Put a brief description below each title.
- Updated the footer to have the correct year and my business name.
- Put a stylish title in the jumbotron along with a description and button to start a new game of Pegger.
I got creative with the title and made it look like it was written over the top of pegs (pegs that I will be reusing when I write the game board UI). I did this by defining a general peg style class that draws the circle shape at an appropriate size and added classes for the red, green, and yellow pegs to render them as different colors. Then all I had to do was put a letter in the span for each peg and presto! I got a decent home page without having to create a single image.
The resulting index.html and styles (located in css/app.css) will look like the text below. Notice that for now I’m pulling in Bootstrap using an external CDN instead of including it directly in the project.
index.html
1
2
3
4
5
6
7
8
9
10
11
12
13
14
15
16
17
18
19
20
21
22
23
24
25
26
27
28
29
30
31
32
33
34
35
36
37
38
39
40
41
42
43
44
45
46
47
48
49
50
51
52
<!doctype html>
<html lang="en" xmlns="http://www.w3.org/1999/html">
<head>
<meta charset="utf-8">
<meta http-equiv="X-UA-Compatible" content="IE=edge">
<meta name="viewport" content="width=device-width, initial-scale=1">
<meta name="description" content="Pegger is a simple little two player peg jumping strategy game">
<meta name="author" content="Erik Gillespie erik.gillespie@technicalrex.com">
<title>Pegger</title>
<link rel="stylesheet" href="https://maxcdn.bootstrapcdn.com/bootstrap/3.2.0/css/bootstrap.min.css">
<link rel="stylesheet" href="css/app.css">
</head>
<body>
<div class="container">
<div class="jumbotron">
<h1>
<span class="peg r">P</span>
<span class="peg g">E</span>
<span class="peg y">G</span>
<span class="peg g">G</span>
<span class="peg r">E</span>
<span class="peg y">R</span>
</h1>
<p class="lead">Welcome to the home of Pegger, a simple little peg jumping strategy game for two! If you're a curious developer there is also source code and a tutorial series that you can peruse.</p>
<p><a class="btn btn-lg btn-primary" href="#todo" role="button">Play Pegger</a></p>
</div>
<div class="row marketing">
<div class="col-lg-6">
<h4><a href="rules.html">Rules</a></h4>
<p>You could probably learn the rules by playing the game but here's a summary just in case.</p>
<h4><a href="about.html">About</a></h4>
<p>Learn about the author of Pegger and how the game was inspired.</p>
</div>
<div class="col-lg-6">
<h4><a href="http://technicalrex.com/tag/pegger/?order=asc">Tutorial</a></h4>
<p>If you're a developer and want to read about how Pegger was made then read through this tutorial.</p>
<h4><a href="https://github.com/egillespie/pegger">GitHub</a></h4>
<p>Another developer resource for those who just want to browse the Pegger source code, report bugs, or request new features.</p>
</div>
</div>
<div class="footer">
<p>© Erik Gillespie. 2014</p>
</div>
</div>
</body>
</html>
css/app.css (partial)
1
2
3
4
5
6
7
8
9
10
11
12
13
14
15
16
17
18
19
20
21
22
23
24
/* --- Narrow Jumbotron Styles Go Here --- */
.peg {
display: inline-block;
width: 1.1em;
height: 1.1em;
border: 1px solid #937e62;
border-radius: 50%;
background-color: white;
margin: 5px;
color: white;
}
.r {
background-color: #d9534f;
border-color: #c9302c;
}
.g {
background-color: #5cb85c;
border-color: #449d44;
}
.y {
background-color: #fef049;
border-color: #ffd663;
}
The resulting page will look like this:
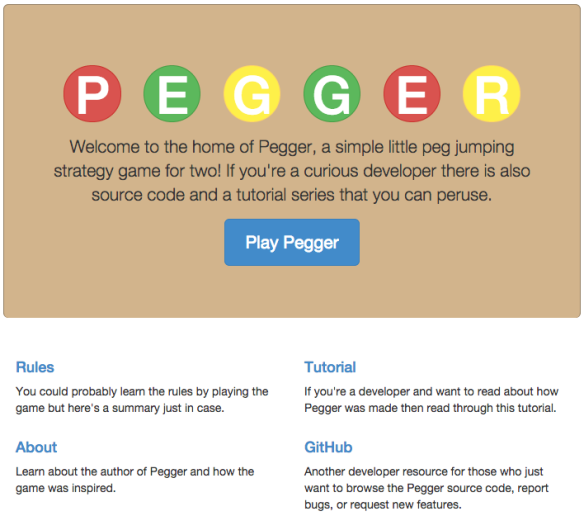 Pegger Home Page
Introducing AngularJS
AngularJS is a JavaScript framework developed by some of the folks at Google. It offers a lot of functionality that makes creating a rich, interactive web site a pleasure, even for someone who doesn’t tend to call himself a UI developer. I’ll use a number of popular AngularJS features for Pegger such as view templates, event handling, dependency management, AJAX requests, navigation/routing, and scope management.
To start this off I update index.html to include minified versions of angular.js and angular-route.js in the `` tag. I also include some standard JavaScript files that I will use to organize the Angular code: app.js, controllers.js, and services.js.
In order to properly introduce Angular to the web app I also supply ng-app and ng-controller directives. I will also change the Bootstrap jumbotron to a placeholder for the Angular view templates. By default the jumbotron will still show the button to start a new game, but when this button is clicked then the Pegger board will be rendered inside the jumbotron.
Here’s what the pertinent parts of index.html look like now:
index.html (partial)
1
2
3
4
5
6
7
8
9
10
11
12
<html lang="en" xmlns="http://www.w3.org/1999/html" ng-app="peggerApp">
<head>
<!-- meta, title, css, etc. -->
<script type="text/javascript" src="https://ajax.googleapis.com/ajax/libs/angularjs/1.3.0-rc.3/angular.min.js"></script>
<script type="text/javascript" src="https://ajax.googleapis.com/ajax/libs/angularjs/1.3.0-rc.3/angular-route.min.js"></script>
<script type="text/javascript" src="js/app.js"></script>
<script type="text/javascript" src="js/controllers.js"></script>
<script type="text/javascript" src="js/services.js"></script>
</head>
<body ng-controller="PeggerCtrl">
<div class="container">
<div class="jumbotron" ng-view></div>
The default content of the jumbotron got moved into partials/home.html:
partials/home.html
1
2
3
4
5
6
7
8
9
10
<h1>
<span class="peg r">P</span>
<span class="peg g">E</span>
<span class="peg y">G</span>
<span class="peg g">G</span>
<span class="peg r">E</span>
<span class="peg y">R</span>
</h1>
<p class="lead">Welcome to the home of Pegger, a simple little peg jumping strategy game for two! If you're a curious developer there is also source code and a tutorial series that you can peruse.</p>
<p><a class="btn btn-lg btn-primary" href="#/play" role="button">Play Pegger</a></p>
The App, Controller, and Service
At the highest level of the client portion of the web app I need to define an Angular module that will collect all of the other services, controllers, and configuration into a central location. Typically this module is called the application or app.
The Pegger app will be relatively small since it will only need to group up the controller and service as well as define a default template for our view and the alternate “board” view for when a user is actually playing a game of Pegger.
js/app.js
1
2
3
4
5
6
7
8
9
10
11
12
var peggerApp = angular.module('peggerApp', ['ngRoute', 'peggerControllers', 'peggerServices']);
peggerApp.config(['$routeProvider', function ($routeProvider) {
$routeProvider
.when('/play', {
templateUrl: 'partials/board.html',
controller: 'PeggerCtrl'
})
.otherwise({
templateUrl: 'partials/home.html'
});
}]);
The “/play” route that I have defined corresponds to the anchor tag in home.html that links to “#/play”. When a user clicks the button the content of the jumbotron will be replaced with the content of partials/board.html and the functionality for that view will be managed by the Pegger controller. I will show you the content of board.html after the controller is defined, since it relies heavily on the attributes and functions made available in that controller’s scope.
The service is the next easiest piece to construct. This service parameterizes and calls the HTTP API that I created in an earlier article of this tutorial series. Besides the parameters to the API, the service also expects a caller to provide custom success and error handlers for the HTTP response.
I chose to use $http instead of $resource to demonstrate the hierarchical structure of the API. I will probably switch to $resource at some point in the future since it is easier to read and offers some nice higher level conveniences such as parameterized URLs.
js/services.js
1
2
3
4
5
6
7
8
9
10
11
12
13
14
15
16
17
18
19
20
21
22
23
24
25
26
27
28
29
30
var peggerServices = angular.module('peggerServices', []);
peggerServices.factory('games', ['$http', function($http) {
return {
post: function(success, error) {
return $http.post('/games').then(function(response) {
success(response);
}, function(response) {
error(response);
});
},
byId: function(gameId) {
return {
pegs: {
byId: function(pegId) {
return {
put: function(data, success, error) {
return $http.put('/games/'+gameId+'/pegs/'+pegId, data).then(function(response) {
success(response);
}, function(response) {
error(response);
});
}
}
}
}
}
}
}
}]);
This defines a service that has the following accessible functions:
games.post([success], [error])- Creates a new game.games.byId({gameId}).pegs.byId({pegId}).put([data], [success], [error])- Attempts to move a peg.
The last piece of JavaScript that I need to put in place is the controller. Controllers are where all of the hard work gets done in an Angular app. In the case of Pegger (a single controller app) the controller is responsible for maintaining the state of the game board, managing interactions with the game, calling the server, and translating the server responses to something that can be presented to the user. Even for a small app such as Pegger this results in a decent amount of code.
js/controllers.js
1
2
3
4
5
6
7
8
9
10
11
12
13
14
15
16
17
18
19
20
21
22
23
24
25
26
27
28
29
30
31
32
33
34
35
36
37
38
39
40
41
42
43
44
45
46
47
48
49
50
51
52
53
54
55
56
57
58
59
60
61
62
63
64
65
66
67
68
69
70
71
72
73
74
75
var peggerControllers = angular.module('peggerControllers', []);
peggerControllers.controller('PeggerCtrl', ['$scope', 'games', function ($scope, games) {
$scope.selectedPeg = null;
games.post(function(response) {
$scope.game = response.data;
$scope.messageKey = '';
}, function(response) {
$scope.messageKey = 'games.post.error';
});
findPeg = function(row, column) {
var pegs = $scope.game.pegs;
for (var i = 0; i < pegs.length; i++) {
if (pegs[i].position.row == row && pegs[i].position.column == column) {
return pegs[i];
}
}
return null;
};
selectPeg = function(row, column) {
$scope.selectedPeg = findPeg(row, column);
};
$scope.pegStyle = function(row, column) {
var style = '';
var peg = findPeg(row, column);
if (peg) {
style += peg.type[0];
}
if ($scope.selectedPeg && $scope.selectedPeg.position.row == row
&& $scope.selectedPeg.position.column == column) {
style += " selected";
}
return style;
};
$scope.pegClicked = function(row, column) {
if ($scope.selectedPeg) {
var peg = JSON.parse(JSON.stringify($scope.selectedPeg));
peg.position.row = row;
peg.position.column = column;
games.byId($scope.game.gameId).pegs.byId(peg.pegId).put(peg, function(response) {
$scope.selectedPeg = null;
$scope.game = response.data;
$scope.messageKey = '';
$scope.message = '';
}, function(response) {
$scope.selectedPeg = null;
switch (response.status) {
case 400:
$scope.messageKey = 'pegs.notSelected.error';
break;
case 404:
$scope.messageKey = 'games.notFound.error';
break;
case 409:
$scope.messageKey = 'pegs.conflict.error';
break;
case 422:
$scope.messageKey = 'pegs.user.error';
$scope.message = response.data.message;
break;
default:
$scope.messageKey = 'pegs.put.error';
break;
}
});
} else {
selectPeg(row, column);
}
};
}]);
Here are the starting line numbers and descriptions of some of the more important pieces of this controller:
- 3 - Include the
gamesservice as a dependency. - 6 - Create a new game as soon as the controller is invoked and put the initial game state in scope.
- 10 - Expose a function to determine the style classes for a given peg. The type of peg and whether or not the peg are selected both affect the style applied to the peg.
- 41 - If a peg is clicked/tapped and another peg is already selected then instruct the server to move the peg. Update the game state if the move was successful (including the display of a “Game Over” message) or print an error message to the user if not.
- 71 - If a peg is clicked/tapped and another peg is not already selected then select that peg.
Draw the Board
The final piece of this puzzle is the rendering of the game board. Now that I have a controller with some functionality exposed, this becomes very easy.
Basically all I have to do is display two rows of four pegs and associate each of the pegs with the style and action that should be invoked when that peg is clicked. The magic of Angular is that any time the state of the game changes, this template will automatically be updated to reflect the current representation of the game.
The larger portion of this template is dedicated to interpreting errors and displaying user-friendly messages for all of the different “bad move” scenarios that must be supported.
partials/board.html
1
2
3
4
5
6
7
8
9
10
11
12
13
14
15
16
17
18
19
20
21
22
23
24
25
26
27
28
29
30
31
32
33
34
35
<div class="board">
<div>
<span class="peg " ng-click="pegClicked(1,1)"></span>
<span class="peg " ng-click="pegClicked(1,2)"></span>
<span class="peg " ng-click="pegClicked(1,3)"></span>
<span class="peg " ng-click="pegClicked(1,4)"></span>
</div>
<div>
<span class="peg " ng-click="pegClicked(2,1)"></span>
<span class="peg " ng-click="pegClicked(2,2)"></span>
<span class="peg " ng-click="pegClicked(2,3)"></span>
<span class="peg " ng-click="pegClicked(2,4)"></span>
</div>
</div>
<div class="alert alert-danger" role="alert" ng-show="messageKey == 'games.post.error'">
Oh snap! Something went wrong creating your game. <a href="javascript:location.reload()">Try again?</a>
</div>
<div class="alert alert-danger" role="alert" ng-show="messageKey == 'pegs.notSelected.error'">
You have to select a peg in order to move a peg.
</div>
<div class="alert alert-warning" role="alert" ng-show="messageKey == 'pegs.user.error'">
</div>
<div class="alert alert-danger" role="alert" ng-show="messageKey == 'games.notFound.error'">
Woops! That game doesn't exist any more. Would you like to create a <a href="javascript:location.reload()">new game?</a>
</div>
<div class="alert alert-danger" role="alert" ng-show="messageKey == 'pegs.conflict.error'">
You can't move a different peg than what is selected.
</div>
<div class="alert alert-danger" role="alert" ng-show="messageKey == 'pegs.put.error'">
Gremlins got into your game. They may have broken your game permanently but try taking another turn just in case this is a false alarm.
</div>
<div class="alert alert-info" role="alert" ng-show="game.gameOver">
Game Over! <a href="javascript:location.reload()">Try again?</a>
</div>
Server Side Changes
Before I can call the first iteration of the Pegger UI complete there are a couple of server side changes that must be made.
The first is expected and easy to fix. I have to add index.html to the welcome file list in the project’s web.xml so users can leave off the “/index.html” from the path in their address bar when typing the URL.
web.xml (partial)
1
2
3
4
5
6
<web-app>
...
<welcome-file-list>
<welcome-file>index.html</welcome-file>
</welcome-file-list>
</web-app>
The other change was not to expected but fortunately has a ridiculously easy fix.
By default, Jersey hands off the handling of HTTP errors to the servlet container when it is done. Unfortunately, Google App Engine’s dev and production servers do not handle those responses in the same way!
In dev, the server uses Jersey’s response. In production though, the response is overwritten with a generic (and ugly) HTML error page. This causes the error handling in the Pegger controller to totally break and draw an empty <div> below the board whenever the user makes an invalid move… but only in production. Dev works fine.
The solution is to enable a feature in Jersey that post-processes the response and leads to the response entity always being retained. This setting can be enabled in web.xml like so:
web.xml (partial)
1
2
3
4
5
6
7
8
9
10
11
12
13
14
15
16
17
<web-app>
...
<servlet>
<servlet-name>jerseyServlet</servlet-name>
<servlet-class>org.glassfish.jersey.servlet.ServletContainer</servlet-class>
<init-param>
<param-name>javax.ws.rs.Application</param-name>
<param-value>com.technicalrex.webapp.pegger.internal.JerseyConfig</param-value>
</init-param>
<init-param>
<param-name>jersey.config.server.response.setStatusOverSendError</param-name>
<param-value>true</param-value>
</init-param>
<load-on-startup>1</load-on-startup>
</servlet>
...
</web-app>
What’s Next?
I’m not really a UI developer but I was able to implement all of the client side changes detailed above in six or so hours. I’m pretty pleased with the results but I think there are still a few tweaks to be made.
Here are some things I would eventually like to try out and explain in a follow-up tutorial:
- Get rid of the
location.reload()calls by exposing the initialization of the controller. - Create a custom directive for rendering pegs. It was fairly tedious to hand type each one and would be an interesting exercise.
- Add a transition effect when a user first clicks the “Play Pegger” button. Perhaps slide the current view out and the new one in.
- Introduce a wait indicator or icon when an action is performed so the user knows that their click or tap registered and the server is doing work.
- Add logic to the client to allow deselecting a peg.
- Refactor the
gamesservice to use$resourceinstead of$http. - Get a real UI developer’s feedback and implement their suggestions.
Thanks for reading and stay tuned for my next article!