Lots of product photos are taken with a white background. So what do you do if you want to promote that product, but the white background of the image clashes with the non-white background of your website? In this tutorial I will show you some quick tricks to make the image background transparent so it looks more natural on your own site.
Software
Before we start, you need to know that this tutorial uses Gimp, a completely free image editor. If you want to use Photoshop, you can follow the techniques outlined in this article, but the specific steps are written for a novice Gimp user.
Install Gimp and you’re ready to rock.
Let’s Get Started
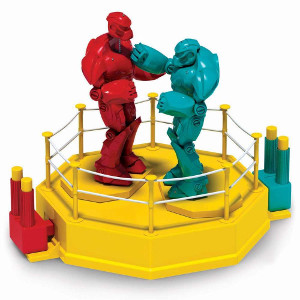
Suppose you have an image saved to your computer named product.jpg. Its original dimensions are 1000x1000 pixels. It will looks something like this:
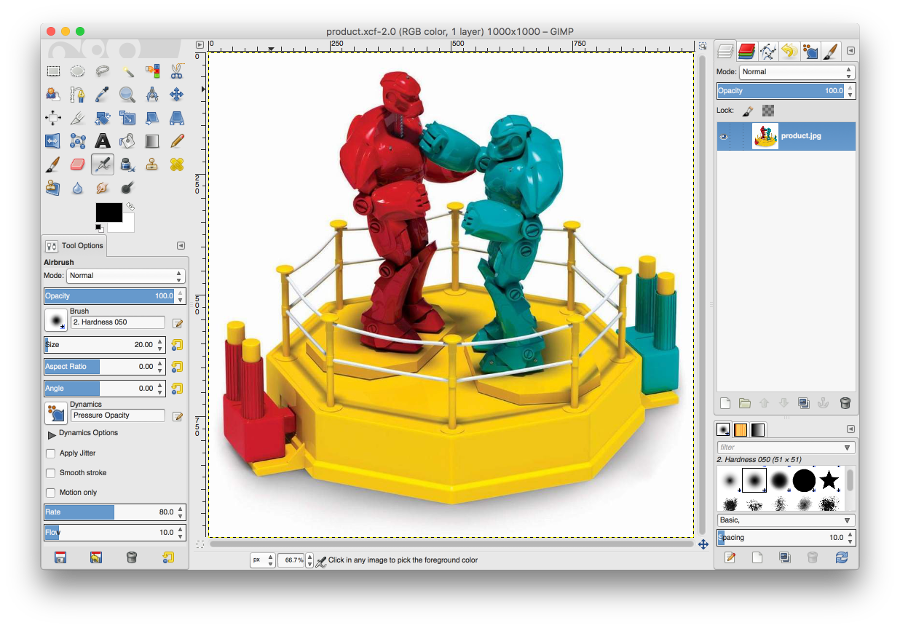
The first step is to open your file in Gimp. Follow these instructions, step by step.
Open File in Gimp
- Run Gimp.
- Select
Open...from theFilemenu. - A window titled “Open Image” will appear. Use this window to find the image on your computer.
- Select the image and click Open.
Now Gimp should show the image. It will look something like this:
Enable Transparency
This step is critical if you want your background to be transparent. JPG files do not support transparency, and even if the image is a GIF or PNG, transparency may not be enabled.
Important Step: To enable transparency, choose Layer > Transparency > Add Alpha Channel. If the option is disabled or grayed out then transparency is already enabled.
Time to Play with Fire
You are now ready to get rid of that pesky background! Depending on what the image looks like, there are several techniques you can use. Each technique below describes the situation when it may most effectively be used before stepping through the technique itself.
Oh, make a backup copy of your image, just in case. Gimp also creates a long history of changes that you’ve made and you can choose Edit > Undo numerous times if you make mistakes. Undo is your friend.
After you apply any of the techniques below, take a close look at the region that was selected. If you’re not happy with the results, you can click on Select > None and try again.
Cut the Selection: The final step in every one of the techniques below is to
Technique 1: Fuzzy Select
Use this technique where the background is one solid color. If there are shadows that you would like to get rid of, you can use the Fuzzy Select technique to remove most of the background and then use one of the other techniques to remove the shadows.
The Fuzzy Select tool takes the color of the area where you clicked and selects as much of that color in one large, contiguous area as possible. You can also adjust the color Threshold for this tool to select more or fewer shades of a color.
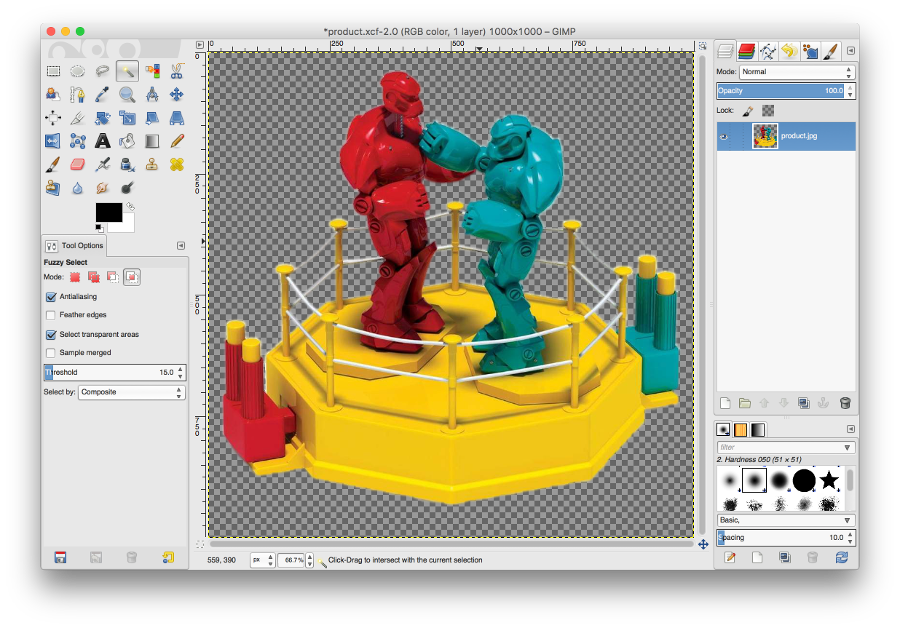
This seems like a good first technique to try on the white background of our image. Let’s give it a shot.
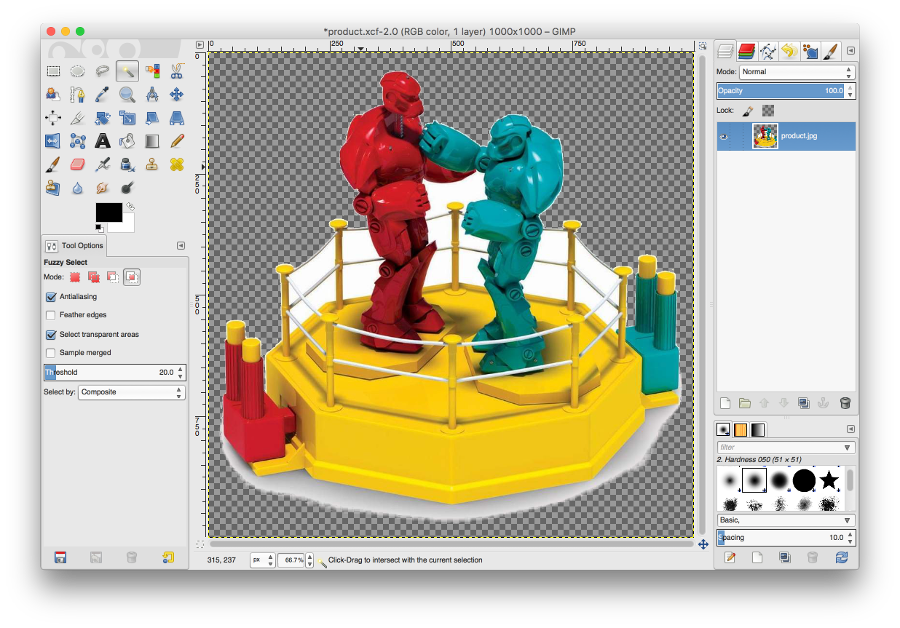
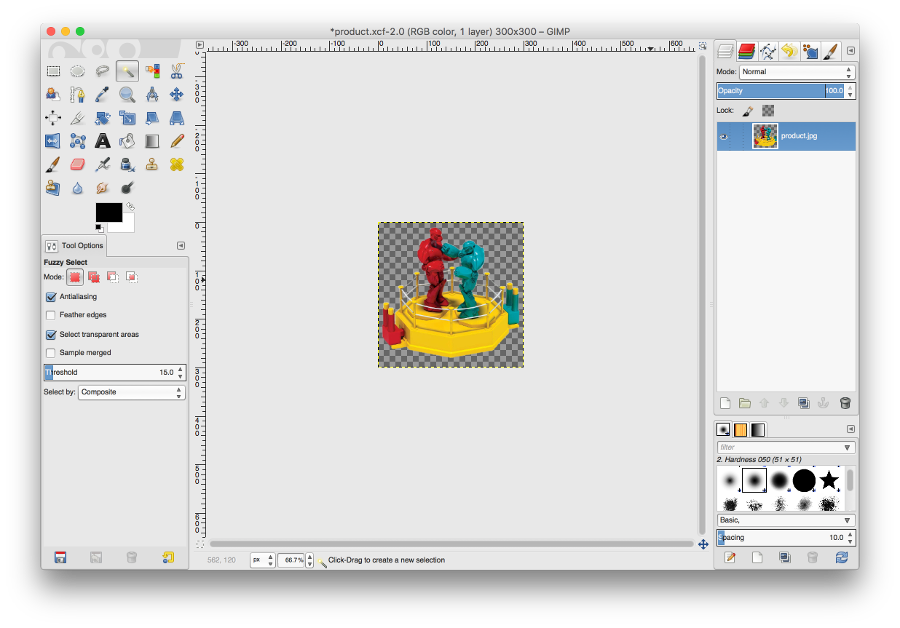
Use the Fuzzy Select Tool
- In the tool panel on the left, click on the Fuzzy Select icon
 .
. - Click in the large white area in the upper left of the image.
- Look closely at the selection and decided if it is good enough.
- If the selection looks nice and tight, select
Edit > Cutto delete the selection.
Here’s what the cleared selection looks like on our image using a Threshold of 15.0:

Select More with the Fuzzy Select Tool
Fuzzy Select worked pretty well, but if you look closely around the robots’ shoulders, you can see there is a little bit of white between the selection boundary and the red/blue of the robots.
Increase the Threshold to select more:
- Choose
Select > NoneorEdit > Undo Fuzzy Select. - Increase the Threshold value by 5.0 (to 20.0):

- Repeat the “Use the Fuzzy Select Tool” steps.
The selection wraps most of the robot quite snuggly now. There’s still the matter of those shadows below the game, and there is a little bit of white still clinging to the outline of the robots, but we’ll take care of those soon.
Select Less with the Fuzzy Select Tool
In certain situations the Fuzzy Select tool will select too much. For example, if you try to fuzzy select the background between the ropes on the right side of the game, you will see that some of the rope is selected, too. That’s because the ropes there are close enough in color to the background that the tool can’t differentiate the two.
Try decreasing the Threshold to select less:
- Choose
Select > NoneorEdit > Undo Fuzzy Select. - Decrease the Threshold value by 5.0 (to 10.0):

- Repeat the “Use the Fuzzy Select Tool” steps.
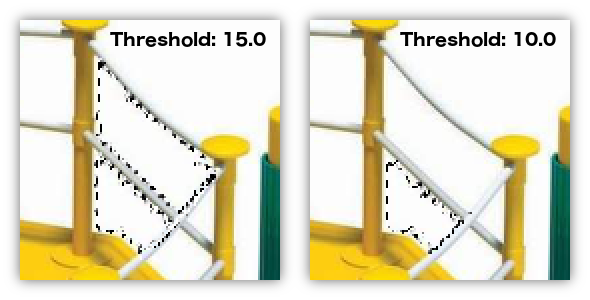
Decreasing the Threshold will help sometimes, but not always. In the image above, you can see that the rope does not get selected when the Threshold is lowered to 10.0, but you can see a shark tooth effect on the selection that was made, so it’s not always the perfect solution, either.
Fortunately, the techniques below offer some better alternatives to removing the background when you have similarly-colored content that you want to keep.
Technique 2: Scissor Select
Use the Scissor Select technique if your subject has a lot of contrast with the background and long, gently-curved edges. Brightly-colored objects such as games, toys, and clothes on a light or dark background work well.
The Scissor Select tool attempts to find edges near where you clicked and trace that border as you continue to click. When you use the tool, click on the edges anywhere that the object being selected has a sharp angle or change in color.
While you are using the tool, you can also click and drag on any of the lines that have already been drawn and adjust them. Gimp will add an additional guide point where you clicked and try to detect the edges again from where you moved the line.
Let’s use the Scissor Select tool on the shadows below the product that fuzzy select didn’t do so well on.
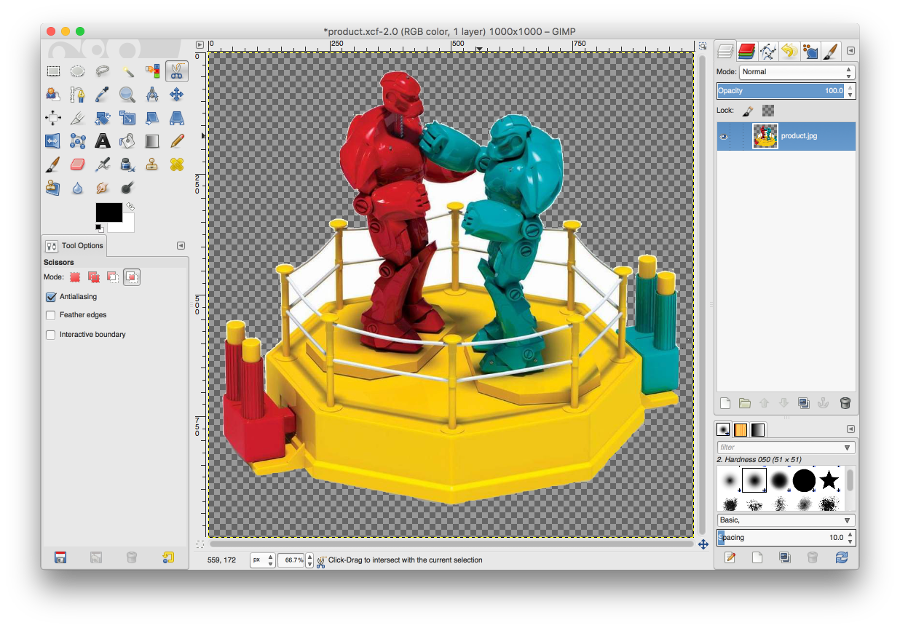
Use the Scissor Select Tool
- In the tool panel on the left, click on the Scissor Select icon
 .
. - Click on an edge in the middle of where you want your selection to begin. In our image, the very lowest point of the yellow base is a good place to start.
- Click on the next point along the edge that has a change in color or direction.
- Continue clicking around the area that you want to remove. You can also click across the transparent, checkered areas and around the edge of the image.
- When you are nearing the point where you started, click on the starting point to close your selection area.
- Look closely at the selection points and lines. You can click and drag to adjust any of them at this point.
- Click in the middle of the area you want to select to make the selection active.
- Shrink the selection a little bit to leave some of the background in place.
a. Click on
Select > Shrink...in the menu. b. In the window that appears, enter 1 or 2 px and click OK. - Select
Edit > Cutto delete the selection.
Here’s what the pre-selection area looks like, just before Step 7:

And here’s what the image looks like after shrinking and cutting the selection:
Not bad! The edges look even nicer than what the Fuzzy Select left us with, but imagine how much clicking you would have to do to use the Scissor Select tool on the whole image!
Technique 3: Polygon Select
Use the Polygon Select technique if the subject of your photo is rigid or has lots of straight edges. Boxes, cards, books and other polygonally-shaped objects are perfect for this technique.
Look for regions of the background that have straight edges on all sides. In our example, several of the spaces between the ropes and the ring look like perfect triangles and diamonds. Let’s use the Polygon Select tool on those.
- In the tool panel on the left, click on the Free Select icon
 .
. - Carefully click on all of the corners of the background region that you wish to delete.
- When you want to close your selection, click on the point that started your selection.
- Look closely at the selection and decided if it is good enough.
- If the selection looks nice and tight, select
Edit > Cutto delete the selection.
Here’s what our image looks like after deleting a few of the polygonal areas in the middle of the game:

Cut the Rest
With these three techniques, we can finish removing the background from the image. For the regions below the bottom rope, I recommend using the Fuzzy Select so as not to accidentally remove pieces of the rope.
For the remaining pieces of background, the Polygon Select will probably require the least amount of clicking and adjusting.
Here’s what I ended up with. Keep reading to see how to clean up those edges.

If you want to trim any of the white off of the edges, you can do so now. If you’re going for quick and dirty, just follow the steps below to smooth the edges.
Smooth the Edges
The background has been removed, sure, but there are still little remnants of the white background around the edges of the product. Here’s a poor man’s trick for getting rid of the rest of the background and smoothing the edges of our product all at once.
- Click on the Fuzzy Select icon .
- Hold the Shift key and click on every transparent background region.
- Click on
Select > Grow..in the menu. - In the window that appears, choose 2 px and click OK.
- Click on
Filters > Blur > Gaussian Blur...in the menu. - In the window that appears, enter 5.0 px for both the Horizontal and Vertical Blur Radius values and click OK.
The resulting image still has hints of white, but overall it doesn’t look that bad.
Resize the Image
The last step before saving the image is to resize it. Shrinking the image will get rid of the ghostly effect that smoothing the edges caused, and it will further eliminate artifacts of the original background color.
- Click on
Image > Scale Image...in the menu. - In the window that appears, do the following: a. Enter the Width that you would like your new image to be. The Height will automatically adjust proportionally to the Width you enter, so leave it alone. b. Enter 72 as the X Resolution. The Y Resolution will automatically adjust to match the X Resolution, so leave it alone. c. Click OK.
For our example, I chose 300 px as the Width and got the following:
Export the File
It’s tough to really know how well you did until you save your work and use the image somewhere. Use the following steps to save your work:
- Click on
File > Export As...in the menu. - Navigate to the folder where you would like to save the image.
- Enter “product.png” as the Name of the file and click Export. Using the file extension “.png” is important!
- In the window that appears, just click Export.
You can now use the image wherever you want and it will automatically inherit the background on which it is placed!
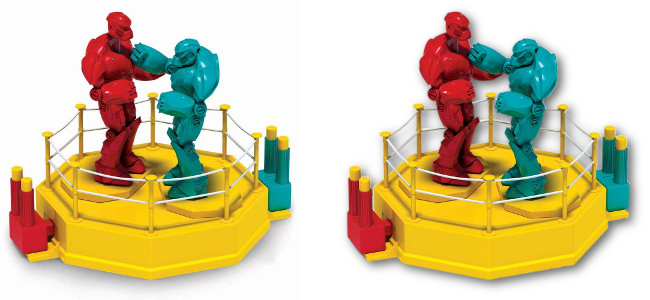
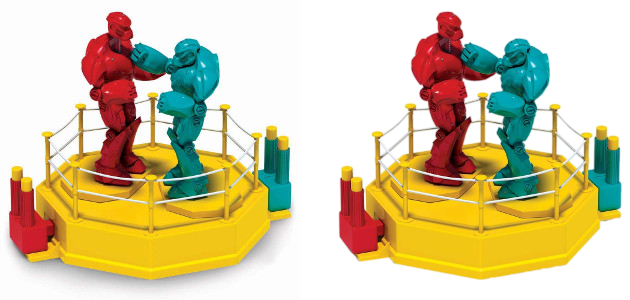
Here’s the result of our work placed next to the original. It’s not perfect, but it’s pretty good and usually that’s all that matters!
Bonus: Shadows
Do you miss those shadows? Me too. Let’s add some back in!
Those shadows make the images pop, give the page a sense of depth, and they can even cover up some of the flaws remaining from when we removed the solid background color.
The steps to add a shadow are pretty straight forward:
- Click on
Filters > Light and Shadow > Drop Shadow...in the menu. - In the window that appears, do the following: a. Enter 4 as the Offset X and Offset Y. b. Enter 15 as the Blur Radius. c. Use black as the Color. d. Enter 60 as the Opacity. e. Click OK.
Adding a shadow may change the size of your image. Follow the steps in “Resize the Image” to get back to the image dimensions that you would like to use.
Here’s what the image looks like with a shadow. Pretty sweet!